Monday, November 25, 2013

Carry of the Week - Wiggleproof Back Carry (WP)


A few weeks ago I realized we had a problem - a big one. Solomon discovered he could dig his toes into my hips and stand-up while in a back carry...Apparently, this is the most fun thing an almost 8-month-old baby could imagine because he literally did it within 5 minutes of any carry for an entire week solid. My old stand-by rebozo carries were out the window! On to the ruck. Surely this little monster couldn’t unruck himself, right? Wrong! He discovered that once firmly standing on my hip bones, a couple of good bounces would unseat the deepest of seats. And pop he did. I tried putting the bottom rail in his pants waistband. I made double sure he was beyond knee-to-knee and lots of fabric between us. But, alas. The trick could not be unlearned and I fully came to understand the terror in the term “seat-popper.”


On to find new carries I went! Now, everyone should know by now that I HATE a chest pass. There is a very good reason for this but one which is a bit too personal for an internet blog post. But, suffice it to say, I am more amply endowed than is comfortable with a chest pass. So I had to find unpoppable carries that DIDN’T involve chest passes. Double Hammock was out. I posted on the FB group page of my woe’s and C.J. came to my rescue! She suggested the wiggleproof back carry (which I naively thought was the same as a norwegian wiggleproof back carry - it isn’t). Several youtube videos later, I had a new carry to practice. Now, I will say this carry was a bit harder for me to get down than others I have tried. But it is definitely worth the patience and persistence. It is a heavy-duty multi pass carry that can finish in several ways, forbids seat-poppage, keeps LO warm and contained, and DOES NOT involve a chest pass!


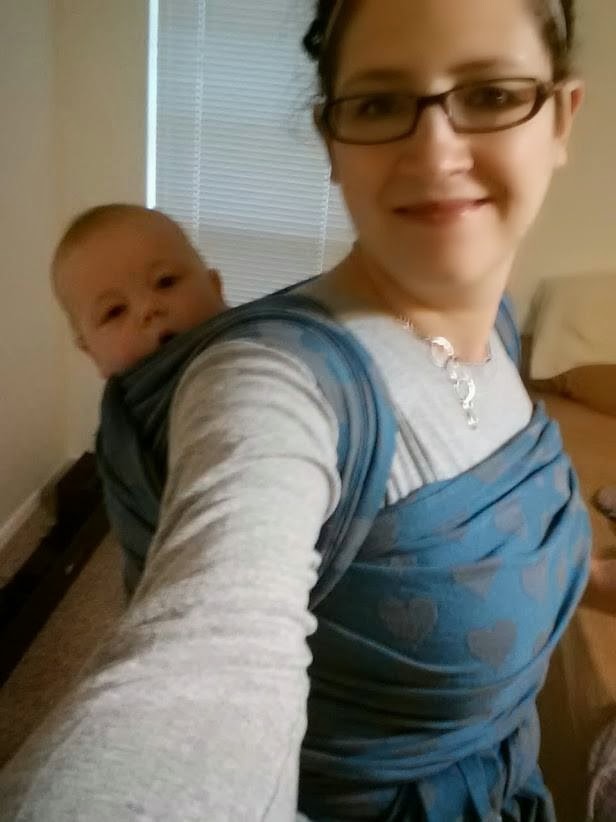
The wiggleproof is true to its name and prevents even the most determined of babes from escaping. This carry is essentially a basic rucksack with two additional back passes for reinforcement. This carry is done with a longer wrap, such as a size 6 or 7. This carry also has double ruckstraps over your shoulders so is best done with a thinner wrap. If the wrap is too thick it will be difficult to move your arms and to even keep the fabric in place. I find a 100% cotton wrap to be best for me in this carry.


Basic steps:
1 - Get baby on your back with the middle marker in the center of LO’s back and make a seat;
2 - Take one side and hold between your knees while sandwiching the shoulder of the other side so that both rails are towards your neck and the fold is on the outside of your shoulder;
3 - At your armpit level, put one twist in the tail and bunch the fabric bringing it under your arm, behind you and up between LO’s legs;
4 - Grab your top rail between LO’s legs and bring up in a diagonal across their body and over your opposite shoulder;
5 - Both tails are over your shoulders;
6 - Switch sides and repeat the above steps with your long tail (twist and bunch, bring up between LO’s legs, spread to knee and cross on a diagonal);
7 - Both tails are again over your shoulders;
8 - Take both tails and tie a half knot at your collar bone;
9 - Bring your rails around over baby’s legs and tie under bum.
* If your wrap is not long enough, you can skip the knot tie and simply take the straps back around under your arms, over baby’s legs, and tie under bum. You can also skip bringing the wrap around again and tie in front tibetan style.


Picture Demonstration: http://www.thebabywearer.com/forum/showthread.php?112898-Wiggle-Proof-Back-Carry-Photo-Instructions* (This is on the Baby Wearer forum so you must have an account to be able to see the pictures)


Video Demonstration with candy-cane chest belt finish variation: http://www.youtube.com/watch?v=zoTKVJ8HKEw


If you have a seat-popping, leg-straightening, wiggley wrappee this is definitely a carry to try! Please let me know if you have any carry requests and I will get them worked in!


Tiffany Johnson is a breastfeeding, baby wearing, co-sleeping, attachment parenting mama to three beautiful children. She is currently taking a leave of absence from her busy career as an estate planning attorney to focus on her home and family. In her spare time she loves crafting, reading a good book, red wine, all things geeky, and loving on her babies.

Tuesday, November 19, 2013

Don't Get Discouraged


I feel the need to write this blog post for those who may be discouraged about wrapping.  It can be very overwhelming and intimidating.
I began attempting to wrap in January 2013 and I am just now able to do it successfully.  So do not give up!  It is a mix of finding the right size wrap & the right material that works for you.  Thanks to the lending library I was able to borrow several wraps and try them out.  I found very quickly which ones I did not like for sure, which usually ended up being the new ones that weren’t broken in yet.  ;-)

I had the most difficult time getting a good seat.  Then I finally got that down after several teachings from the admins and lots of youtube videos.  There are a few methods to get a good seat but I suggest if you’re struggling to try them all because not all methods work for everyone.  Try them all and find the one that works best for you.  I like these two videos and found them most helpful:
https://www.youtube.com/watch?v=6KOJkQaPwSo
https://www.facebook.com/video/video.php?v=746420530375
 
My next challenge was getting that first pass over my little Mia’s fluffy bum.   Again, after lots of help from admins, youtube videos and lots of sweat and frustration I finally found what worked best for me. 
And at last, the final challenge was getting everything snug and secure enough for it to be comfortable.  Finding that happy medium between too tight and too lose has been difficult but I’ve got this now.
So after approximately 9 months I can finally call myself a wrapper.  Don’t give up ladies (and gentlemen) with some patience and stamina you can get there.  Rely on the meetings, admins and the lending library.  This is why they are available to us to help us be the best babywearers we can be.  ;-)


                January 26, 2013                                                                            September 16, 2013


I am first a Christian then I am a babywearing, cloth diapering, work at home Momma to a beautiful 15 month old little girl, Mia.   We love to read books and go the park (I feel like I’m writing a singles add, lol).  We try to have play dates with like-minded parents and their little’s.   When I do get some “me” time I like to get a pedicure and maybe catch a movie or catch up on my Mommy shows (I am a reality tv junkie J )


Monday, November 11, 2013

CotW - Kinderpack Hip Carry

Changing up Carry of the Week a little bit, here is one for you SSC lovers!  Give this quick hip carry a try, you may discover whole new worlds with your beloved SSC or develop a new found appreciation of SSCs in general.  Without further ado, CotW!
 
Hello. My name is Heather and I am a Kinderpack addict. This love was further cemented on Friday at Gilcrease Museum’s Museum Babies program. Had the dude comfortably riding on my back only to learn the museum prefers babies worn in front or hip carries (seems some curious backriding babes were grabbing at priceless art……oops!). Having successfully hip carried numerous times with the Ergo, decided to do the same with my Kinderpack. Worked like a charm and very easy to do!

First unsnap all buckles, slide buckles to maximum length, and push the Perfect Fit Adjusters (PFAS) as close to the buckles as possible.
 
Next, ignore the smattering of toys on the floor and place the Kinderpack around your waist to accommodate a hip carry. Snap the front shoulder strap into back buckle to create a sling. Slide the sling over your head. This makes the seat for baby.


 Insert baby into the carrier. Bring the back shoulder strap around your waist and snap it into the front buckle. Tighten until baby feels secured.


Slide the front, diagonal strap onto your shoulder. Snap the PFAS behind you for additional support and to keep the front, diagonal strap from applying unnecessary neck pressure. Initially, do not be surprised if assistance is needed to buckle the PFAS. It helps to have them out and accessible before you put baby in the carrier. Tighten the front, diagonal shoulder strap as needed.


Voila! You are now successfully hip carrying in the Kinderpack. Happy Babywearing!


**Side note - this hip carry can also be done in any SSC where the straps unbuckle.  That includes Ergos and others.


Heather Langley is an avid babywearer and proud mom to Rex, age 19 months. She is a Babywearing Around Tulsa administrator and Employment Specialist at Family & Children's Services Women in Recovery program. Heather enjoys spreading the babywearing love, music, reading, and spending time with her friends and family.

Saturday, November 9, 2013

In My Arms ISO

Have you ever fallen in love with a carrier just to find out it's hard to find (HTF) or highly sought after (HSA)?  At some point in your babywearing days you'll be in search of (ISO) or even desperately in search of (DISO) a carrier.  It could be your first carrier or your twentieth or even you've lost track of how many churner flavor of the week carrier.  ISO answering mamas are a huge blessing to those that seek limited edition, HTF, HSA carriers, or just looking for some great deals.  Sometimes though these ISOs come with larger than life/retail price tags.  Regardless, if you've ever been DISO a carrier that has been fulfilled, you will understand the joy that comes to your heart when you are asked to pay and then again when you receive it.  It's different than receiving any other fluffy mail.  It's more than Christmas. 
   
PAXbaby has a wonderful ISO Angel service.  Randomly they  will post asking for your ISOs of carriers that they carry or have carried in the past.  The ISO Angel  pulls strings, searches boxes being sent for conversions, unreleased boxes, etc to find as many ISOs as she can.  Unfortunately not everyone's ISOs are found nor fulfilled, but when just one is it truly is like winning the lottery. 
Recently I added my ISO to PAXbaby's ISO Angel List.  Within a week I was sent a link to pay, I ransacked the house for things to sell. Bought my ISO.  Stalked it with tracking.  Checked my door/porch 3 times within the hour it was marked delivered.  Called the post master.  Snooped on neighbors doorsteps looking at their packages.  The post master appeared and snooped in my neighbors' mailboxes.  Package was located and I was hugging my wrap.  I opened the package before even heading inside my house.  Both babies were napping so I wore it as a shirt.  I swear it never fails.  Fluffy mail only comes when your wrapee is asleep.
Soon though baby girl woke up and we were off to playing.  The best part for me is that I received a woven I love and didn't have to pay over retail.  My ISO was Girasol Zig Zag.  It is a new herringbone weave with colored weft stripes and cream warp.  It truly makes it one of a kind.  This baby was like touching a cloud.  It was soooo soft.  I quickly did a FWCC to test drive it.  OH MY it was one of the easiest FWCC I've ever done, in fact I actually got it too tight!  It's quite thin but very supportive.  My size 6 folds up to about the same size as my ring sling, so it's been going everywhere with us in the diaper bag.  I've had it for almost a month now and just now washed it.  Since it was so soft I didn't feel like it needed to be washed to help break it in.  Except for Halloween I haven't even used any other wrap :/
I've also fulfilled DISOs.  It's a high knowing that your carrier will not only be loved but will be treated like it's a king or queen!
Have you ever received for fulfilled an ISO request?  What was it?


C.J. North is a Babywearing Institute Scholar who is also an aspiring photographer. She stays home with her three kids; 6yo stepson, 3yo son, and 8mo daughter. C.J. has always loved working with children. In her spare time, she manages the allergy and special needs of her family, while being overly addicted to research.


Monday, October 28, 2013

Carry of the Week - Front Cross Carry (FCC)


This week we are going to visit a staple that should be in every babywearers handbook, the Front Cross Carry. This is my absolute favorite front carry and one I recommend every new babywearer learn. This is one of the few “poppable carries”- you can pre-tie this carry and put baby in and take them out without re-tieing! This is great for squishy babies when you have a lot of changing diapers, etc. going on. This is also a fabulous carry for a nervous public wrapper! Pre-tie at home and pop baby in when you get to your destination! I used this carry for every preschool drop-off for the first 4 months of my LO’s life.
 
 
We started this series with the Front Wrap Cross Carry (FWCC) and this is very similar so if you did that carry with us you won’t have any trouble picking this one up - this carry doesn’t have the vertical torso pass. This carry is also a great nursing carry. This carry can be done with your base size wrap on up. So my base size is a 5 and I can do this carry with a 5, 6 or 7.


You start this carry with a pre-tie:
1 - Bunch the middle marker at the center of your back;
2 - Bring both tail in front of you and cross the as you bring them over your shoulders;
3 - I like to put my arms inside the crosses and pull out just a bit to make sure there is room for my LO;
4 - Cross again in the back and bring the tails around to tail in front at your waist.
5 - You will essentially have a torso pass across your back with an X in the front and and
X in the back with the ends tied at your belly botton.


After you get a pre-tie you can insert your baby as follows:
1 - Find your inside pass, the X that is nearest to your body and put you baby against the
OPPOSITE shoulder
2 - Lower baby into the X with one leg going into the closer X
3 - Switch baby to the opposite shoulder and insert their other leg into the other side of
the X
4 - Lower baby to sit in the bottom of the X and adjust both sides to fit knee to knee
starting with the inside pass
5 - I like to untie my tie and bounce up a bit while pulling down to tighten my wrap (you
can also go strand by strand to tighten while holding the opposite rail between your
knees)
6 - Tie under baby’s bottom in a double knot.
You can remove the baby from the wrap without un-tieing by doing the above only backwards: Raise baby up towards opposite shoulder of inside pass and remove the first leg and then switch to the opposite shoulder to pull the baby all the way out.


One of the best things about this carry is how easy it is to discreetly nurse in. Here is a video demonstrating that: http://www.youtube.com/watch?v=SMrng7kp0gE
If you find your wrap is a bit on the short side to tie in front, here is a knotless varriation that you can try: http://www.youtube.com/watch?v=aVwuTpp-N-o
   
As always, please post your pictures on the Facebook page as well as any tips, suggestions, or struggles. If you have a problem you want a carry solution for, please let me know! I love to create posts by request.


Tiffany Johnson is a breastfeeding, baby wearing, co-sleeping, attachment parenting mama to three beautiful children. She is currently taking a leave of absence from her busy career as an estate planning attorney to focus on her home and family. In her spare time she loves crafting, reading a good book, red wine, all things geeky, and loving on her babies.

Wednesday, October 16, 2013

Carry of the Week #5 - Double Hammock (Poppins and Saltwater variations)

There have been some requests for a more advance carry so I thought I would start with a basic double hammock (DH) and spice it up with a couple of finish variations. A double hammock is a secure back carry but it can be a more difficult carry to master because it can be challenging to get the rebozo passes tight enough white trying to keep a chest pass tight. This carry may take a little more effort for those who aren’t as comfortable with a variety of back carries. But I encourage you to try it and for everyone who is ready for the next level, choose one (or both!) of the finish variations to show off!


I also want to point out that a back carry should never be attempted before you are completely comfortable in front carries. I highly suggest seeking the assistance of an instructor before attempting to back carry for the first time but it should always be tried with the help of a spotter and/or over a soft surface (such as a bed) until you are entirely comfortable. It is difficult to gauge how a child is going to react to a back carry (both being wrapped and being taken down) so it is always better to have another set of hands around until you are both very comfortable with the process. This is a great reason to come to a meeting even if you aren’t a new wrapper!

 
The DH, also called Chunei back carry, is a very secure carry because there are two rebozo passes going across your child (like a double hammock!). Remember, a robozo pass has one end going over your shoulder and the other end coming under the opposite arm. This wrap is best done with a size 5-7 woven wrap. The basic steps are:


1 - Start your middle marker at your chest and wrap around to your back; the point your wrap touches the middle of your back is where your new middle marker will be and where you should begin.
2 - Put baby on your back with an off-centered rebozo.
3 - Using the end of the pass going under your arm, spread a torso pass across your chest.
4 - Bring that chest pass around and make a second rebozo pass over the baby, tightening torso pass as you go.
5 - Bring your straps back around and under your arms, bunched or spread reinforcing passes over then under the baby’s legs. and tie off in front. If your wrap is not long enough to tie in front, you can tie under bum (TUB).


Video Tutorial: http://www.youtube.com/watch?v=HYvZNx45isE *Good tips on how to get a tight chest pass!


VARIATION 1 - Poppins Double Hammock (PDH)


This is a DH with the finish inspired by the Poppins hip carry. It is a very pretty variation and great for special occasions, or, if you prefer a one shoulder back carry. You follow the basic double hammock instructions above but instead of bringing your second rebozo pass over your shoulder, you want to bring it under your arm and twist with the tail on the other shoulder to make the “poppins” look. You then wrap around to tie under bum.


Here is a picture of Sol and I’s first attempt at this carry (it’s not perfect!) - We loved how tight and secure it was but how the one-shoulder carry gave him a bit more freedom of movement to one side.


VARIATION 2 - Saltwater Double Hammock (SDH)
This is a double hammock with a very pretty finish but it also helps take pressure of the shoulders so it can be a great variation for those who feel a regular DH is too much strain. Again, you follow the basic steps of a DH but once both your tails are in the Y position over your shoulders you bring them in front, twist at chest pass, wrap the top tail through the chest pass (the bottom tail goes over the chest pass), twist again at the bottom of the chest pass and bring around to tie under bum or, if you have a size 7 wrap, you can go over and under the legs and tie in front.
Video Tutorial - http://www.youtube.com/watch?v=3pWIME2NE2o *at 2:00 mark there is a great tip on how to get a tight rebozo pass using your elbow!


Again, the carries this week are more of the advanced nature but I would love to see some pretty variation pictures. And, please, share any tips or advance, along with those pictures on the facebook page. Everyone’s feedback directly determine next weeks carry, so please let me know what you want to see (or if you want to volunteer to guest post!). I hope you have fun with this carry, I really enjoy having a “special occasion” look I can pull out when needed.


Tiffany Johnson is a breastfeeding, baby wearing, co-sleeping, attachment parenting mama to three beautiful children. She is currently taking a leave of absence from her busy career as an estate planning attorney to focus on her home and family. In her spare time she loves crafting, reading a good book, red wine, all things geeky, and loving on her babies.