Showing posts with label CoTW. Show all posts

Tuesday, December 10, 2013

Carry of the Week - Torso Carry Love

Carry of the Week - Torso Love!


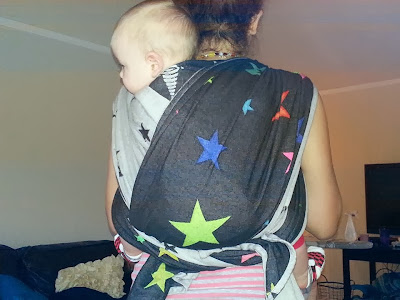
Ok, i’m going to be honest - I did NOT want to do this post. Torso Carries were requested, talked about it, videos linked, promises made. But I didn’t want to do it. The primary reason is I have no core strength. Zero. I’ve alluded to my “back problems” in our group but the fact of the matter is, I have much more than “problems”. A five level spinal fusion to help correct scoliosis when I was 16, with 3 levels collapsing during the pregnancy with my first son, have left me with virtually no core stability. I babywear because I HAVE to (I also love it - so that’s a plus!). Slings are literally the only way I can carry my babies for more than a few feet at a time. So the prospect of putting all that weight solely on my midsection scared me to death. BUT, I love you ladies. So I delved in. And here is what I found: It isn’t that bad! I still prefer to distribute the weight as much as possible but a torso carry was definitely doable. Even for an extended period of time! And Solomon LOVED the freedom of having his upper body free. I almost felt like I wasn’t wearing him because I had so much freedom of movement. And let me tell you, if you have any neck or shoulder problems you are going to love me after this post! :)


When I started researching Torso carries I found that it is basically one carry, used primarily in African cultures, that uses a towel or short piece of cloth to wrap a baby on your back. It honestly is a LOT like wrapping up with a towel - they use the same top rail flip over and it goes under your arms the same. It was very familiar. But I was able to look further and come up with a few far more secure feeling carries. So I am going to show you several methods to Torso carry so you can pick what is best for you. Here is the first video with the “towel” method (I did this with a size 4 gears and tied under bum): http://www.youtube.com/watch?v=rQ6h64S-oto


The first method is a front Torso Carry that is based off a Front Wrap Cross Carry.  The idea here, is after you have baby secured in the torso pass you bring (carefully) both shoulder straps under your arms. You still cross over baby, pass under legs and tie in back. I would say this would work best with smaller babies as toddlers can easily lean back in this one. Be aware, this carry is lower on your body so make sure you are always aware of babe’s neck and face and be familiar with babywearing safety (make sure their chin is never on their chest, etc). The good thing about this carry is you could use a size up or down from your base size and make it work (basically sizes 4-7).  The key to keeping this one comfortable is TIGHTNESS. Always start with your bottom and top rails and don’t forget to tighten the middle as well.
Here is the video Tutorial: http://www.youtube.com/watch?v=iyfwI46s7Wk


The next method is a back torso carry and is based on a double hammock. This is best for older babies because they need to have really good head and neck control to be on your back without the support of a wrap higher up around them. This carry is done with your base size or a size up (usually a 6 or 7). You start this carry like the traditional double hammock (refer back to our earlier blog post on a DH), and when you get to the cheerleader Y pull, you bring both passes under your arms and tie in a knot at your chest (you can see this in my picture). I used my base size so brought my ends back around and tied under bum. If you are sized up you can cross over and under babies legs and tie in front. Whatever is most comfortable for you and what size you have. Here is the Video Tutorial: http://www.youtube.com/watch?v=Ny_jR0DDKhE


There is a similar Torso Carry to the one above done with a shortie (size 3 or 4). It is similar to the DH variant above, but ends with the chest tie. I did this with our size 3 Cheetah and wrapped the tails back under the wrap. Here is the video: http://www.youtube.com/watch?v=uwum3eybbl8


Finally, we have a Torso carry using a Ring Sling! This is starts out just like a back carry in a ring sling (get baby in the sling then scoot them on to your back) but you slip your arm out before doing the final tighten. Here is the video: http://www.youtube.com/watch?v=qZ_qhMfysEU


OK! I think the Torso Carry compendium is complete! I hope you guys find one of these variations you like and PLEASE post pictures in the group! I love to see people trying a new carry because I suggested it - just makes my day! And, as always, if you have a suggestion or request for the next CotW please let me know and guest writers are ALWAYS welcome.


Tiffany Johnson is a breastfeeding, baby wearing, co-sleeping, attachment parenting mama to three beautiful children. She is currently taking a leave of absence from her busy career as an estate planning attorney to focus on her home and family. In her spare time she loves crafting, reading a good book, red wine, all things geeky, and loving on her babies.

Monday, November 25, 2013

Carry of the Week - Wiggleproof Back Carry (WP)


A few weeks ago I realized we had a problem - a big one. Solomon discovered he could dig his toes into my hips and stand-up while in a back carry...Apparently, this is the most fun thing an almost 8-month-old baby could imagine because he literally did it within 5 minutes of any carry for an entire week solid. My old stand-by rebozo carries were out the window! On to the ruck. Surely this little monster couldn’t unruck himself, right? Wrong! He discovered that once firmly standing on my hip bones, a couple of good bounces would unseat the deepest of seats. And pop he did. I tried putting the bottom rail in his pants waistband. I made double sure he was beyond knee-to-knee and lots of fabric between us. But, alas. The trick could not be unlearned and I fully came to understand the terror in the term “seat-popper.”


On to find new carries I went! Now, everyone should know by now that I HATE a chest pass. There is a very good reason for this but one which is a bit too personal for an internet blog post. But, suffice it to say, I am more amply endowed than is comfortable with a chest pass. So I had to find unpoppable carries that DIDN’T involve chest passes. Double Hammock was out. I posted on the FB group page of my woe’s and C.J. came to my rescue! She suggested the wiggleproof back carry (which I naively thought was the same as a norwegian wiggleproof back carry - it isn’t). Several youtube videos later, I had a new carry to practice. Now, I will say this carry was a bit harder for me to get down than others I have tried. But it is definitely worth the patience and persistence. It is a heavy-duty multi pass carry that can finish in several ways, forbids seat-poppage, keeps LO warm and contained, and DOES NOT involve a chest pass!


The wiggleproof is true to its name and prevents even the most determined of babes from escaping. This carry is essentially a basic rucksack with two additional back passes for reinforcement. This carry is done with a longer wrap, such as a size 6 or 7. This carry also has double ruckstraps over your shoulders so is best done with a thinner wrap. If the wrap is too thick it will be difficult to move your arms and to even keep the fabric in place. I find a 100% cotton wrap to be best for me in this carry.


Basic steps:
1 - Get baby on your back with the middle marker in the center of LO’s back and make a seat;
2 - Take one side and hold between your knees while sandwiching the shoulder of the other side so that both rails are towards your neck and the fold is on the outside of your shoulder;
3 - At your armpit level, put one twist in the tail and bunch the fabric bringing it under your arm, behind you and up between LO’s legs;
4 - Grab your top rail between LO’s legs and bring up in a diagonal across their body and over your opposite shoulder;
5 - Both tails are over your shoulders;
6 - Switch sides and repeat the above steps with your long tail (twist and bunch, bring up between LO’s legs, spread to knee and cross on a diagonal);
7 - Both tails are again over your shoulders;
8 - Take both tails and tie a half knot at your collar bone;
9 - Bring your rails around over baby’s legs and tie under bum.
* If your wrap is not long enough, you can skip the knot tie and simply take the straps back around under your arms, over baby’s legs, and tie under bum. You can also skip bringing the wrap around again and tie in front tibetan style.


Picture Demonstration: http://www.thebabywearer.com/forum/showthread.php?112898-Wiggle-Proof-Back-Carry-Photo-Instructions* (This is on the Baby Wearer forum so you must have an account to be able to see the pictures)


Video Demonstration with candy-cane chest belt finish variation: http://www.youtube.com/watch?v=zoTKVJ8HKEw


If you have a seat-popping, leg-straightening, wiggley wrappee this is definitely a carry to try! Please let me know if you have any carry requests and I will get them worked in!


Tiffany Johnson is a breastfeeding, baby wearing, co-sleeping, attachment parenting mama to three beautiful children. She is currently taking a leave of absence from her busy career as an estate planning attorney to focus on her home and family. In her spare time she loves crafting, reading a good book, red wine, all things geeky, and loving on her babies.

Monday, October 28, 2013

Carry of the Week - Front Cross Carry (FCC)


This week we are going to visit a staple that should be in every babywearers handbook, the Front Cross Carry. This is my absolute favorite front carry and one I recommend every new babywearer learn. This is one of the few “poppable carries”- you can pre-tie this carry and put baby in and take them out without re-tieing! This is great for squishy babies when you have a lot of changing diapers, etc. going on. This is also a fabulous carry for a nervous public wrapper! Pre-tie at home and pop baby in when you get to your destination! I used this carry for every preschool drop-off for the first 4 months of my LO’s life.
 
 
We started this series with the Front Wrap Cross Carry (FWCC) and this is very similar so if you did that carry with us you won’t have any trouble picking this one up - this carry doesn’t have the vertical torso pass. This carry is also a great nursing carry. This carry can be done with your base size wrap on up. So my base size is a 5 and I can do this carry with a 5, 6 or 7.


You start this carry with a pre-tie:
1 - Bunch the middle marker at the center of your back;
2 - Bring both tail in front of you and cross the as you bring them over your shoulders;
3 - I like to put my arms inside the crosses and pull out just a bit to make sure there is room for my LO;
4 - Cross again in the back and bring the tails around to tail in front at your waist.
5 - You will essentially have a torso pass across your back with an X in the front and and
X in the back with the ends tied at your belly botton.


After you get a pre-tie you can insert your baby as follows:
1 - Find your inside pass, the X that is nearest to your body and put you baby against the
OPPOSITE shoulder
2 - Lower baby into the X with one leg going into the closer X
3 - Switch baby to the opposite shoulder and insert their other leg into the other side of
the X
4 - Lower baby to sit in the bottom of the X and adjust both sides to fit knee to knee
starting with the inside pass
5 - I like to untie my tie and bounce up a bit while pulling down to tighten my wrap (you
can also go strand by strand to tighten while holding the opposite rail between your
knees)
6 - Tie under baby’s bottom in a double knot.
You can remove the baby from the wrap without un-tieing by doing the above only backwards: Raise baby up towards opposite shoulder of inside pass and remove the first leg and then switch to the opposite shoulder to pull the baby all the way out.


One of the best things about this carry is how easy it is to discreetly nurse in. Here is a video demonstrating that: http://www.youtube.com/watch?v=SMrng7kp0gE
If you find your wrap is a bit on the short side to tie in front, here is a knotless varriation that you can try: http://www.youtube.com/watch?v=aVwuTpp-N-o
   
As always, please post your pictures on the Facebook page as well as any tips, suggestions, or struggles. If you have a problem you want a carry solution for, please let me know! I love to create posts by request.


Tiffany Johnson is a breastfeeding, baby wearing, co-sleeping, attachment parenting mama to three beautiful children. She is currently taking a leave of absence from her busy career as an estate planning attorney to focus on her home and family. In her spare time she loves crafting, reading a good book, red wine, all things geeky, and loving on her babies.

Tuesday, October 8, 2013

CotW - Rebozo Hip Carry with Slip Knot

Lets start this out with I have nothing against a Ring Sling (RS)... I think they are great especially if you are new to babywearing! I started with a RS as my very first carrier and it was a wrap conversion ring sling. It was my gateway drug for the love of babywearing. That being said I started to have issue with mine as my baby started to getting bigger..

My issue was the rings.. The very part that makes a RS great and easy to use.. My issue I am very boney. Those darn rings started digging into me when I had my little positioned just right. SO I started to get curious about short wraps or shorties.. But what the heck do you do with them! I mean a wrap just for one carry???? NOO there is so much you can do different back carries and hip carries!

So now all of that for this! A rebozo is a type of wrap from Mexico but is often the term used for short wrap and carries. Today we look at one of my favorites. the Rebozo Hip Carry with Slip knot.. We are going to call this a RHC to shorten things up! This carry became my solution to the rings in a RS and I like how your baby can be on your hip and then you can put on the wrap.. Next the very video I used to learn how to do this carry! She makes it so easy and I will pause the video as I go along to watch how to so the knot.


This carry is so easy to learn once you take a moment to learn  a slip knot. The knot can be tricky the first time but don’t give up you can do it!!! Just practice, watch the video, and go step by step… If you're having trouble try doing it without the baby a few times. Once you get it it down BAM a quick easy hip carry and an alternative to the ring sling.


On a side note.. If you're worried about having a short wrap and not getting much use out of it let me assure you you can do lots!! For most people a soft side carrier (ssc) is their go to for quick baby wearing but mine is the a rebozo or shorty wrap. Here is another video that is pretty awesome this mama shows you all the carries you can do with a rebozo slip knot and a short wrap!


I hope to see some pictures of everyone in a RHC!! PLease feel free to post pictures or leave a comment! Also there is now a size 2 in the lending library to check out or try on if you are curious about short wraps!


Adrea Brackett loves babywearing. It was her 'in' to the natural way of parenting and for that she will always be thankful to Amy Rogers! She has been married almost 10yrs and just had her first little one this past January and she is beautiful! When not babywearing or in general being a hippy, she is a weather forecaster for the OK Air National Guard… She has tried to tell them she could get a matching wrap to her uniform and work with her girl on her...They still haven’t gotten back to her! lol She was a military wife before she joined so supporting other military families is a big deal to her. Oh and telling the world how wonderful it is to wear your baby!


Monday, September 30, 2013

CotW - Ring Slings Tummy to Tummy (T2T)

This week I thought we would take a little deviation from our woven wraps and venture into ring slings. Ring slings are a great introduction into the babywearing world as they seem less intimidating than a woven wrap to a lot of beginners. I love keeping a RS around for quick up and down carries or for when my baby is little. The uneven weight distribution makes it impractical for long carries for me but I expect we will be using it more as my LO gets bigger and can help “grab” my hip more in a hip carry.


I wanted to start with the T2T carry because it is a great carry that can go from birth on up. A hip carry in a ring sling can be started once your baby has pretty good head control (approximately 4-6 months old). Once you start really working with your RS you may find it a bit more difficult to use than it appeared at first glance. So we are going to do a brief overview of some basics before we jump into the CotW.


It is best to prepare your rings before you start a carry so you know everything is smoothed out and will adjust easily. Here is a great picture tutorial of how to do this: http://www.wearababy.com/instructions/ringsling?start=1 and here is a great video of ring sling basics and how to thread your rings: http://www.youtube.com/watch?v=L7v0ZbGwPKM


Your baby should always be at or above your waist for a secure fit and you should be able to easily tighten the rails (make sure the fabric is not bunched up around the rings). You want to start with your rings in the “corsage” position (right in the hollow beneath your shoulder). When you put your baby in the RS you want to make sure there is a pocket you can slip baby into and bring the bottom rail of the RS up between baby's legs to get a nice deep seat. A lot of people then lean over, allowing baby to gently rest on the fabric (while holding with one hand) and pull the bottom rail up between you and baby - this is called the “filling your bra” technique - Which is basically just like it sounds: Bend over and adjust the weight in the fabric and stand back up! :) Here’s a video: http://www.youtube.com/watch?v=laq3dbSFAds


It is recommended that all babies, even newborns, go in a “legs out” position when being worn and that the fabric runs knee to knee. My number one tip when using a RS is: It can always be tighter! Always. This will be the most comfortable for you. The baby will literally be pressed right up against your body. make sure when you are finished, the rings are out on your shoulder, not up by your neck. They should also still be in the corsage position. If you find they lower a lot during tightening, try to start with them in a higher position so as they work down they are still high enough to be comfortable for you.


Tummy to Tummy Carry - T2T


1- Start by getting your RS on with the rings in the corsage (or higher) position on your preferred shoulder (usually your non-dominant, so if you are right-handed you want it on your left shoulder);
2- Adjust the main body of your RS so that the pouch is about even with your belly button and make sure there are no twists in the RS fabric;
4 - Leave the top rail loose enough to get baby into the sling;
5 - Hold baby on opposite shoulder as the rings (in the “burp” position) and ease baby into the pouch you have created bringing any excess fabric towards the rings so it can easily be tightened;
6 - Lean over and reach between you and baby pulling fabric up between you two and spreading baby’s legs into a more seated M shaped position (knees higher than bum);
7 - Pull the bottom rail up and away from the rings to tighten and continue to tighten the entire RS all the way up to the top rail.


Tips:


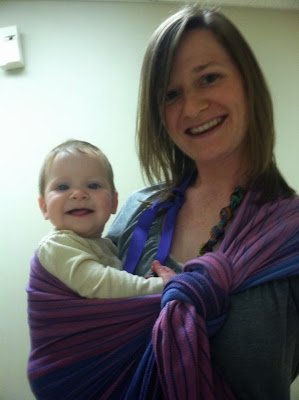
And here is Solomon and I in our Oscha Triskele RS conversion:


I hope some people who don’t have wraps yet are able to participate in this week’s pictures! Please feel free to make a suggestion for a type of carry you would like a little more help with for next week’s carry! Please share any tips you have for using a ring sling or any questions or problems you run into in the comments or on the Facebook page.


Tiffany Johnson is a breastfeeding, baby wearing, co-sleeping, attachment parenting mama to three beautiful children. She is currently taking a leave of absence from her busy career as an estate planning attorney to focus on her home and family. In her spare time she loves crafting, reading a good book, red wine, all things geeky, and loving on her babies.


Monday, September 23, 2013

CoTW - RRRR (Reinforced Rear Ruck Rebozo; A.K.A. Pirate Carry)

  RRRR! 


This week’s carry is another back carry. This is best done with a short wrap (size 2 or 3) but I am doing it with a long 3 (almost a 4) and finishing with a candy-cane chest belt. You can use up to a size 5 and incorporate a chest belt tie off. You could even use a size 6 and finish with a tibetan tie. Even if you only have a size 5 or 6 wrap, practice this carry and allow the tails to hang long. It is often easier to practice “shortie” carries with a longer wrap to begin with. This carry is a ruck variation tied at the shoulder that includes a horizontal pass spread over the child (rather than a bunched pass like in a more traditional ruck).
I couldn’t find a picture tutorial for this specific ruck variation so i’m going to include more detailed written instructions:
1 - Place the middle marker of the wrap on your chest and bring it around to your back. Where the wrap touches your spine is the spot you should center your baby (this carry starts off center)
2 - Once your baby is on your back, start with a rebozo pass with the shorter tail coming under your arm. The middle marker should be hanging over your other shoulder and will line up under your chest if you pull the tail across your body.
3 - Take the tail coming over your shoulder (the long side) under that same arm and across the baby’s back and bum straight across under the opposite arm.
4 - Now you have one tail over your shoulder and one tail under that same shoulder. You can either tie at shoulder, do a candy cane, tibetan, or other finish variation.


Variation (Candy-Cane chest belt): http://www.youtube.com/watch?v=iqt6JTLIFBQ
 
This is a fun, quick carry, that is great for a shorty wrap that can be stashed in a diaper bag. I often use this when I want a little more stability than a quick ruck tied under bum (RUB). I find I can’t tolerate any carry that relies solely on my shoulders for too terribly long. But for a quick run into the grocery store or farmer’s market, this is a great carry.
 
Please leave a suggestion for a carry you would like to see done as the CotW next week!


Tiffany Johnson is a breastfeeding, baby wearing, co-sleeping, attachment parenting mama to three beautiful children. She is currently taking a leave of absence from her busy career as an estate planning attorney to focus on her home and family. In her spare time she loves crafting, reading a good book, red wine, all things geeky, and loving on her babies.