Monday, October 28, 2013

Carry of the Week - Front Cross Carry (FCC)


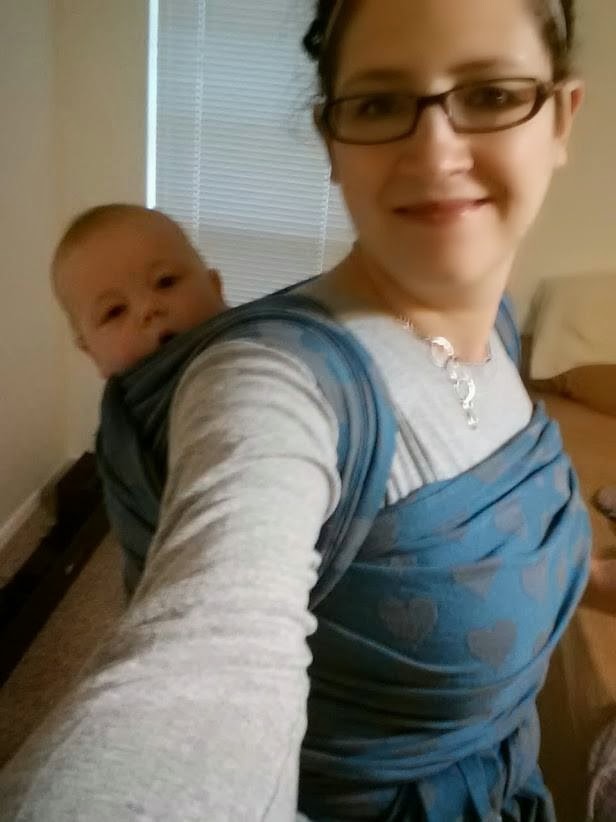
This week we are going to visit a staple that should be in every babywearers handbook, the Front Cross Carry. This is my absolute favorite front carry and one I recommend every new babywearer learn. This is one of the few “poppable carries”- you can pre-tie this carry and put baby in and take them out without re-tieing! This is great for squishy babies when you have a lot of changing diapers, etc. going on. This is also a fabulous carry for a nervous public wrapper! Pre-tie at home and pop baby in when you get to your destination! I used this carry for every preschool drop-off for the first 4 months of my LO’s life.
 
 
We started this series with the Front Wrap Cross Carry (FWCC) and this is very similar so if you did that carry with us you won’t have any trouble picking this one up - this carry doesn’t have the vertical torso pass. This carry is also a great nursing carry. This carry can be done with your base size wrap on up. So my base size is a 5 and I can do this carry with a 5, 6 or 7.


You start this carry with a pre-tie:
1 - Bunch the middle marker at the center of your back;
2 - Bring both tail in front of you and cross the as you bring them over your shoulders;
3 - I like to put my arms inside the crosses and pull out just a bit to make sure there is room for my LO;
4 - Cross again in the back and bring the tails around to tail in front at your waist.
5 - You will essentially have a torso pass across your back with an X in the front and and
X in the back with the ends tied at your belly botton.


After you get a pre-tie you can insert your baby as follows:
1 - Find your inside pass, the X that is nearest to your body and put you baby against the
OPPOSITE shoulder
2 - Lower baby into the X with one leg going into the closer X
3 - Switch baby to the opposite shoulder and insert their other leg into the other side of
the X
4 - Lower baby to sit in the bottom of the X and adjust both sides to fit knee to knee
starting with the inside pass
5 - I like to untie my tie and bounce up a bit while pulling down to tighten my wrap (you
can also go strand by strand to tighten while holding the opposite rail between your
knees)
6 - Tie under baby’s bottom in a double knot.
You can remove the baby from the wrap without un-tieing by doing the above only backwards: Raise baby up towards opposite shoulder of inside pass and remove the first leg and then switch to the opposite shoulder to pull the baby all the way out.


One of the best things about this carry is how easy it is to discreetly nurse in. Here is a video demonstrating that: http://www.youtube.com/watch?v=SMrng7kp0gE
If you find your wrap is a bit on the short side to tie in front, here is a knotless varriation that you can try: http://www.youtube.com/watch?v=aVwuTpp-N-o
   
As always, please post your pictures on the Facebook page as well as any tips, suggestions, or struggles. If you have a problem you want a carry solution for, please let me know! I love to create posts by request.


Tiffany Johnson is a breastfeeding, baby wearing, co-sleeping, attachment parenting mama to three beautiful children. She is currently taking a leave of absence from her busy career as an estate planning attorney to focus on her home and family. In her spare time she loves crafting, reading a good book, red wine, all things geeky, and loving on her babies.

Wednesday, October 16, 2013

Carry of the Week #5 - Double Hammock (Poppins and Saltwater variations)

There have been some requests for a more advance carry so I thought I would start with a basic double hammock (DH) and spice it up with a couple of finish variations. A double hammock is a secure back carry but it can be a more difficult carry to master because it can be challenging to get the rebozo passes tight enough white trying to keep a chest pass tight. This carry may take a little more effort for those who aren’t as comfortable with a variety of back carries. But I encourage you to try it and for everyone who is ready for the next level, choose one (or both!) of the finish variations to show off!


I also want to point out that a back carry should never be attempted before you are completely comfortable in front carries. I highly suggest seeking the assistance of an instructor before attempting to back carry for the first time but it should always be tried with the help of a spotter and/or over a soft surface (such as a bed) until you are entirely comfortable. It is difficult to gauge how a child is going to react to a back carry (both being wrapped and being taken down) so it is always better to have another set of hands around until you are both very comfortable with the process. This is a great reason to come to a meeting even if you aren’t a new wrapper!

 
The DH, also called Chunei back carry, is a very secure carry because there are two rebozo passes going across your child (like a double hammock!). Remember, a robozo pass has one end going over your shoulder and the other end coming under the opposite arm. This wrap is best done with a size 5-7 woven wrap. The basic steps are:


1 - Start your middle marker at your chest and wrap around to your back; the point your wrap touches the middle of your back is where your new middle marker will be and where you should begin.
2 - Put baby on your back with an off-centered rebozo.
3 - Using the end of the pass going under your arm, spread a torso pass across your chest.
4 - Bring that chest pass around and make a second rebozo pass over the baby, tightening torso pass as you go.
5 - Bring your straps back around and under your arms, bunched or spread reinforcing passes over then under the baby’s legs. and tie off in front. If your wrap is not long enough to tie in front, you can tie under bum (TUB).


Video Tutorial: http://www.youtube.com/watch?v=HYvZNx45isE *Good tips on how to get a tight chest pass!


VARIATION 1 - Poppins Double Hammock (PDH)


This is a DH with the finish inspired by the Poppins hip carry. It is a very pretty variation and great for special occasions, or, if you prefer a one shoulder back carry. You follow the basic double hammock instructions above but instead of bringing your second rebozo pass over your shoulder, you want to bring it under your arm and twist with the tail on the other shoulder to make the “poppins” look. You then wrap around to tie under bum.


Here is a picture of Sol and I’s first attempt at this carry (it’s not perfect!) - We loved how tight and secure it was but how the one-shoulder carry gave him a bit more freedom of movement to one side.


VARIATION 2 - Saltwater Double Hammock (SDH)
This is a double hammock with a very pretty finish but it also helps take pressure of the shoulders so it can be a great variation for those who feel a regular DH is too much strain. Again, you follow the basic steps of a DH but once both your tails are in the Y position over your shoulders you bring them in front, twist at chest pass, wrap the top tail through the chest pass (the bottom tail goes over the chest pass), twist again at the bottom of the chest pass and bring around to tie under bum or, if you have a size 7 wrap, you can go over and under the legs and tie in front.
Video Tutorial - http://www.youtube.com/watch?v=3pWIME2NE2o *at 2:00 mark there is a great tip on how to get a tight rebozo pass using your elbow!


Again, the carries this week are more of the advanced nature but I would love to see some pretty variation pictures. And, please, share any tips or advance, along with those pictures on the facebook page. Everyone’s feedback directly determine next weeks carry, so please let me know what you want to see (or if you want to volunteer to guest post!). I hope you have fun with this carry, I really enjoy having a “special occasion” look I can pull out when needed.


Tiffany Johnson is a breastfeeding, baby wearing, co-sleeping, attachment parenting mama to three beautiful children. She is currently taking a leave of absence from her busy career as an estate planning attorney to focus on her home and family. In her spare time she loves crafting, reading a good book, red wine, all things geeky, and loving on her babies.


Sunday, October 13, 2013

Beyond Babywearing


Things happen, they always do!  As a mom I've been peed on, thrown up on, and worse.  As I took my youngest with me to the grocery store and ran into the carts not having a belt (and her yanking my hair; we needed a babywearing break), I decided to put her into the cart and use our ring sling as a belt.  It worked even better than the little strappy belts since she wasn't actually sitting unassisted yet.  This got me to thinking about all the ways we use are carriers that have no babywearing function. 

Even more recently I was peed on...not just peed but flooded on.  My shorts were soaked!  I couldn't have been happier to have a mid length woven in my car as I shimmied out of my shorts and created a skirt with my woven.

Here's some pictures of a few ways BWAT members have learned to use carriers that doesn't envolve babywearing:


Hammock/Swing:
 
Photography Props:
 
 
Petwearing:
 
 
Pregnancy/Postpartum Support Belt:

 
Umbrellas, Sun Visors, etc:

 
Changing Pad, Blankets, Tummy Time/Picnic Blanket, or Pillows:
 
Toys:
 
 
Clothing:

 
Highchair:
 
 
Shopping Cart Cover/Belt
Assist Carrying Injured Person
Leashes for Pets or Kids, Ropes, Straps, etc:
 
Have things made from them, like totes, scarves, bags, necklaces, etc.  This is a great way to remember your babywearing days beyond your babywearing days.


What other ways can you think of? A special thanks to all photographs submitted.  Have more photos to submit, email them to bwatulsa@gmail.com


C.J. North is a Babywearing Institute Scholar who is also an aspiring photographer. She stays home with her three kids; 6yo stepson, 2.5yo son, and 6mo daughter. C.J. has always loved working with children. In her spare time, she manages the allergy and special needs of her family, while being overly addicted to research.


Tuesday, October 8, 2013

CotW - Rebozo Hip Carry with Slip Knot

Lets start this out with I have nothing against a Ring Sling (RS)... I think they are great especially if you are new to babywearing! I started with a RS as my very first carrier and it was a wrap conversion ring sling. It was my gateway drug for the love of babywearing. That being said I started to have issue with mine as my baby started to getting bigger..

My issue was the rings.. The very part that makes a RS great and easy to use.. My issue I am very boney. Those darn rings started digging into me when I had my little positioned just right. SO I started to get curious about short wraps or shorties.. But what the heck do you do with them! I mean a wrap just for one carry???? NOO there is so much you can do different back carries and hip carries!

So now all of that for this! A rebozo is a type of wrap from Mexico but is often the term used for short wrap and carries. Today we look at one of my favorites. the Rebozo Hip Carry with Slip knot.. We are going to call this a RHC to shorten things up! This carry became my solution to the rings in a RS and I like how your baby can be on your hip and then you can put on the wrap.. Next the very video I used to learn how to do this carry! She makes it so easy and I will pause the video as I go along to watch how to so the knot.


This carry is so easy to learn once you take a moment to learn  a slip knot. The knot can be tricky the first time but don’t give up you can do it!!! Just practice, watch the video, and go step by step… If you're having trouble try doing it without the baby a few times. Once you get it it down BAM a quick easy hip carry and an alternative to the ring sling.


On a side note.. If you're worried about having a short wrap and not getting much use out of it let me assure you you can do lots!! For most people a soft side carrier (ssc) is their go to for quick baby wearing but mine is the a rebozo or shorty wrap. Here is another video that is pretty awesome this mama shows you all the carries you can do with a rebozo slip knot and a short wrap!


I hope to see some pictures of everyone in a RHC!! PLease feel free to post pictures or leave a comment! Also there is now a size 2 in the lending library to check out or try on if you are curious about short wraps!


Adrea Brackett loves babywearing. It was her 'in' to the natural way of parenting and for that she will always be thankful to Amy Rogers! She has been married almost 10yrs and just had her first little one this past January and she is beautiful! When not babywearing or in general being a hippy, she is a weather forecaster for the OK Air National Guard… She has tried to tell them she could get a matching wrap to her uniform and work with her girl on her...They still haven’t gotten back to her! lol She was a military wife before she joined so supporting other military families is a big deal to her. Oh and telling the world how wonderful it is to wear your baby!


Do It Yourself Carrier Tutorials

Do It Yourself (DIY) Carriers: General Overview
with Tutorials


There are a lot of ways and types of carriers you can make yourself, if you are a crafty person. It is highly recommended that you use Gutermann's thread or Heavy Duty due to the amount of weight and wear that occurs at the threaded areas. Also due to safety and liability issues, we only recommend that you make your own carriers (or for family members). BCIA and CPSIA are two standards organizations that you should be aware of and compliant with in order to sell or make carriers for others. These standards are becoming even more strict and including lead, chemical and weight testing for all fabric/thread used. If you have questions about these standards, please message C.J., Ashley, or Somer and we will be happy to point you in the right direction if we cannot answer them ourselves.


Stretchy Wrap (such as a moby, sleepy wrap...) - Very easy to make and no sewing is even required. You can use 5.5-6 yards of cotton knit fabric (with stretch no more than 30%), cut it down the middle length wise and you're done! You can hem or serge it all the way around for a more finished look but it's not necessary at all. This does create 2 stretchy wraps.


Water Wrap- This can also be done very easily and no sewing is required. You get 5.5-6 yards of football mesh, cut it in half length wise and you have 2 wraps. You can serge the edges all the way around if you want, but it's not necessary at all.


Woven Wrap- This can be done with minimal sewing skills. You can use gauze (great for newborns in the summer), osnaburg or 100% linen (other fabrics can be used, though they do need to be considered bottom weight). All 3 are safe for front, hip and back carries. The amount you need will depend on the length of wrap you want. If you want a standard long wrap (approximately a size 6), you'd need 5.5 yards of the fabric you choose. You should be able to cut it down the middle length wise to get 2, but this will depend on the width of the bolt. We recommend 24-27 inches wide for a wrap when finished so it would need to be at least 50 inches wide to get 2 out of one piece (most manufactured wovens are 27in for reference). After cutting it length wise you can also "taper" the ends which is cutting them at an angle. This will help when tying it when you wrap as it won't be so bulky. A difference of 5-6 inches cut at an angle is a decent amount. You create the tapers opposite of each other (meaning, on one end of the wrap the "top" is longer with the "bottom" shorter, on the other end the "top" would be shorter and the "bottom" would be longer; laid flat the direction is the same /==/). Then, you'll hem it all the way around the length and width of the wrap. It may also be helpful to add a "middle marker" which is easier to do prior to cutting the tapers. This can be done by just a short decorative stitch, a small scrap piece of a decorative fabric to mimic a tag, or just a few stitches. This will help you when wrapping to know where you should start from depending on the carry you choose to do.


Ring Slings- This can be done with moderate sewing skills. We only recommended to purchase the rings used for slings from slingrings.com as they have been weight tested for babywearing (though o rings used for horses can be used they are heavy compared to sling rings). Sling rings are also not welded so they have no weak points in them which under pressure could cause them to break. There are wonderful tutorials on how to make ring slings on sleeping baby production's website. Fabric choices are numerous but the fabric does determine the type of sling that needs to be sewn. A bottom weight fabric can be used in one layer only. A pretty quilter's fabric we recommend in a double layer with a bottom weight. A medium weight fabric we suggest using two layers. Multiple layers can also be warmer and more difficult to adjust.
 
· Reversible Ring sling(same fabrics) http://www.sleepingbaby.net/jan/Baby/reversible.html
· Reversible (different types of fabrics) http://www.sleepingbaby.net/jan/Baby/reverse2.html
· Two layer with lightweight fabric- http://www.sleepingbaby.net/jan/Baby/doublelayer.html


8 Steps to create an X Box Stitch


Mei Tais- This can be done with a moderate to higher level of sewing skill. Thread choice is very important as the thread carries weight. Also reinforcing all seams, extending the straps at least 6 inches into the carrier, and using "x boxes" (shown above) on the shoulder straps where they extend into the body of the carrier is important to insure the likeliness of the carrier ripping is minimal. Also if using a lighter weight fabric a bottom weight support panel between the layers of the body is suggested (can be a full panel or an internal X or U support panel, see below). Using multiple layers or bottom weight fabrics are also suggested for all straps. There are a lot of great tutorials and patterns out there on how to make a MT and many threads over on thebabywearer.com. Here is the link to a post there with numerous patterns and directions.
 
· faux ball baby overall MT- http://www.sleepingbaby.net/jan/Baby/bbo.html
· wrap conversion MT- http://www.wrapmeitai.blogspot.com/
o(You could do this with 100% linen and Osnaburg fabric as well.)
· Scandi MT Tutorial- http://scanditute.blogspot.com/


Internal X Support Panel
 
 
Soft Structured Carriers- This can be done with moderate to higher level sewing skills. Just as with a MT, thread choice is very important. Also seam reinforcements, straps sunk into the body, and "x boxing" on connecting areas are important. We also suggest that double or bottom weight fabrics be used as straps and if using a light weight fabric that a support panel be used. It is also recommended to use only weight tested buckles (to the weight limit that you feel comfortable with; I have found buckles tested to 90lbs for a $1 each).
 
· SSC PDF download pattern- http://www.mediafire.com/?whdfr3hbm9t


Podaegis (Pods)- This is a blanket type carrier with straps on the top. These can be made with moderate sewing skills. As the same with a MT, thread choice is important as well as sinking the straps and "x boxing" them to reinforce them. Straps should be a bottom weight fabric or a double layer as well as the blanket.


Angela Miller is an extraordinary mother to 4, including a rambunctious boy, an adorable set of twins, and new, little girl that likes to keep her on her toes. In Angela's very little free time, she enjoys DIY carriers and is aspiring to purchase a loom!


C.J. North is a Babywearing Institute Scholar who is also a certified elementary teacher.  She stays home with her three kids; 6yo stepson, 2.5yo son, and 6mo daughter.  C.J. has a love/hate relationship with cloth diapers and is crunchier than she ever thought she would be.  She also manages the allergy and special needs of her family, while being overly addicted to research.