Monday, September 30, 2013

CotW - Ring Slings Tummy to Tummy (T2T)

This week I thought we would take a little deviation from our woven wraps and venture into ring slings. Ring slings are a great introduction into the babywearing world as they seem less intimidating than a woven wrap to a lot of beginners. I love keeping a RS around for quick up and down carries or for when my baby is little. The uneven weight distribution makes it impractical for long carries for me but I expect we will be using it more as my LO gets bigger and can help “grab” my hip more in a hip carry.


I wanted to start with the T2T carry because it is a great carry that can go from birth on up. A hip carry in a ring sling can be started once your baby has pretty good head control (approximately 4-6 months old). Once you start really working with your RS you may find it a bit more difficult to use than it appeared at first glance. So we are going to do a brief overview of some basics before we jump into the CotW.


It is best to prepare your rings before you start a carry so you know everything is smoothed out and will adjust easily. Here is a great picture tutorial of how to do this: http://www.wearababy.com/instructions/ringsling?start=1 and here is a great video of ring sling basics and how to thread your rings: http://www.youtube.com/watch?v=L7v0ZbGwPKM


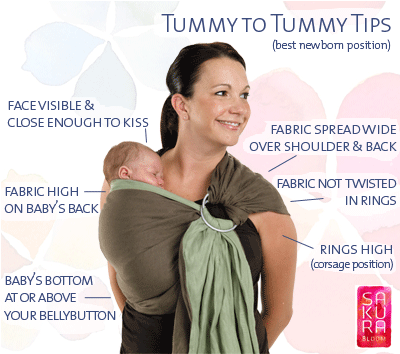
Your baby should always be at or above your waist for a secure fit and you should be able to easily tighten the rails (make sure the fabric is not bunched up around the rings). You want to start with your rings in the “corsage” position (right in the hollow beneath your shoulder). When you put your baby in the RS you want to make sure there is a pocket you can slip baby into and bring the bottom rail of the RS up between baby's legs to get a nice deep seat. A lot of people then lean over, allowing baby to gently rest on the fabric (while holding with one hand) and pull the bottom rail up between you and baby - this is called the “filling your bra” technique - Which is basically just like it sounds: Bend over and adjust the weight in the fabric and stand back up! :) Here’s a video: http://www.youtube.com/watch?v=laq3dbSFAds


It is recommended that all babies, even newborns, go in a “legs out” position when being worn and that the fabric runs knee to knee. My number one tip when using a RS is: It can always be tighter! Always. This will be the most comfortable for you. The baby will literally be pressed right up against your body. make sure when you are finished, the rings are out on your shoulder, not up by your neck. They should also still be in the corsage position. If you find they lower a lot during tightening, try to start with them in a higher position so as they work down they are still high enough to be comfortable for you.


Tummy to Tummy Carry - T2T


1- Start by getting your RS on with the rings in the corsage (or higher) position on your preferred shoulder (usually your non-dominant, so if you are right-handed you want it on your left shoulder);
2- Adjust the main body of your RS so that the pouch is about even with your belly button and make sure there are no twists in the RS fabric;
4 - Leave the top rail loose enough to get baby into the sling;
5 - Hold baby on opposite shoulder as the rings (in the “burp” position) and ease baby into the pouch you have created bringing any excess fabric towards the rings so it can easily be tightened;
6 - Lean over and reach between you and baby pulling fabric up between you two and spreading baby’s legs into a more seated M shaped position (knees higher than bum);
7 - Pull the bottom rail up and away from the rings to tighten and continue to tighten the entire RS all the way up to the top rail.


Tips:


And here is Solomon and I in our Oscha Triskele RS conversion:


I hope some people who don’t have wraps yet are able to participate in this week’s pictures! Please feel free to make a suggestion for a type of carry you would like a little more help with for next week’s carry! Please share any tips you have for using a ring sling or any questions or problems you run into in the comments or on the Facebook page.


Tiffany Johnson is a breastfeeding, baby wearing, co-sleeping, attachment parenting mama to three beautiful children. She is currently taking a leave of absence from her busy career as an estate planning attorney to focus on her home and family. In her spare time she loves crafting, reading a good book, red wine, all things geeky, and loving on her babies.


Monday, September 23, 2013

CoTW - RRRR (Reinforced Rear Ruck Rebozo; A.K.A. Pirate Carry)

  RRRR! 


This week’s carry is another back carry. This is best done with a short wrap (size 2 or 3) but I am doing it with a long 3 (almost a 4) and finishing with a candy-cane chest belt. You can use up to a size 5 and incorporate a chest belt tie off. You could even use a size 6 and finish with a tibetan tie. Even if you only have a size 5 or 6 wrap, practice this carry and allow the tails to hang long. It is often easier to practice “shortie” carries with a longer wrap to begin with. This carry is a ruck variation tied at the shoulder that includes a horizontal pass spread over the child (rather than a bunched pass like in a more traditional ruck).
I couldn’t find a picture tutorial for this specific ruck variation so i’m going to include more detailed written instructions:
1 - Place the middle marker of the wrap on your chest and bring it around to your back. Where the wrap touches your spine is the spot you should center your baby (this carry starts off center)
2 - Once your baby is on your back, start with a rebozo pass with the shorter tail coming under your arm. The middle marker should be hanging over your other shoulder and will line up under your chest if you pull the tail across your body.
3 - Take the tail coming over your shoulder (the long side) under that same arm and across the baby’s back and bum straight across under the opposite arm.
4 - Now you have one tail over your shoulder and one tail under that same shoulder. You can either tie at shoulder, do a candy cane, tibetan, or other finish variation.


Variation (Candy-Cane chest belt): http://www.youtube.com/watch?v=iqt6JTLIFBQ
 
This is a fun, quick carry, that is great for a shorty wrap that can be stashed in a diaper bag. I often use this when I want a little more stability than a quick ruck tied under bum (RUB). I find I can’t tolerate any carry that relies solely on my shoulders for too terribly long. But for a quick run into the grocery store or farmer’s market, this is a great carry.
 
Please leave a suggestion for a carry you would like to see done as the CotW next week!


Tiffany Johnson is a breastfeeding, baby wearing, co-sleeping, attachment parenting mama to three beautiful children. She is currently taking a leave of absence from her busy career as an estate planning attorney to focus on her home and family. In her spare time she loves crafting, reading a good book, red wine, all things geeky, and loving on her babies.


Monday, September 16, 2013

Carry of the Week: Jordan’s Back Carry

Before we jump into the carry this week, I thought a general introduction to back carries would be helpful. A lot of people (and babies!) prefer a back carry over a front carry because the baby is able to look around more and see what is going on around him. It is also very helpful for the wearer to have free mobility of both arms. I almost always do a back carry to cook dinner or give my older kids a bath for example.
 
Back carries can be a little intimidating at first, especially for newer wrappers. I generally try to get my LO as high as possible (if I can’t lean my head back and touch the top of his, I re-do), and make sure I have the passes on his back as tight as possible. When I want to just double check on him, I often tickle his feet to feel him wiggle around. It is always best to practice a back carry over a bed, or soft area, and have someone there to spot you the first several times. It can also be helpful to practice in front of a mirror.
 
There are several methods for actually getting your baby on your back, the hip scoot and superman are two favorites. This link shows several methods for getting your child on your back with picture and video tutorials: http://www.wrapyourbaby.com/babyonback.htm
 
Once your baby is on your back, getting a good seat is very important. If my son is wearing pants when I do a back carry, I will often tuck the bottom rail into the top of his pants before I put him on my back to get the seat started. You always want material between the baby and you and the aim is to get the seat from knee to knee. A good seat is probably the most difficult part of back carries and one that takes lots of practice to master. C.J. made a great tutorial for getting a good seat using your teeth, and this is the method I most often use: https://www.facebook.com/video/video.php?v=746420530375

This week we had a request for a multi-pass back carry that would show the design of the wrap as much as possible. In meeting that request the Carry this week is the Jordan’s Back Carry (JBC). This is a slightly more advanced carry but I think if you have experience with a back carry you should be able to master it without any problems. This carry can be done with a size 4, 5, or 6 wrap.
 

Jordan’s Back Carry is basically one rebozo pass (a rebozo pass is one tail going over the wrappers shoulder and the other going under the wrappers arm, on a diagonal. A rebozo pass goes over both of the baby’s legs and stay on the baby’s back), one cross pass, and one torso pass. The steps are:

1 - Centered rebozo pass over baby on wrappers back;
2 - using the end of the pass going under the wrappers arm, flip it back up over the shoulder;
3 - Cross pass over the baby
4 - Take the other tail of the wrap and come under the wrappers arm;
5 - Torso pass over the baby (this will show off the wrap design),
6 - Tie off in front.

 
There are several variations of this carry that add an extra rebozo or cross pass (rebozo passes help with leaning children and cross passes help with leg straighteners). Since this is already a mixed pass carry, it is good for most wiggly babies and an added pass variation can help if your is an exceptional wiggle-worm.


Variation: Chest belt (size up for this) https://www.youtube.com/watch?v=vVpKCThuztU


Variation: Half-Jordan Back Carry can be done with wrap sizes 2, 3, or 4: https://www.youtube.com/watch?v=OcshSFS7HhI


Please post your pictures of the Carry this week and let us know if you have any suggestions for next week’s carry or would like to write the next CoTW blog post!


Tiffany Johnson is a breastfeeding, baby wearing, co-sleeping, attachment parenting mama to three beautiful children. She is currently taking a leave of absence from her busy career as an estate planning attorney to focus on her home and family. In her spare time she loves crafting, reading a good book, red wine, all things geeky, and loving on her babies.

Sunday, September 15, 2013

Introducing the BWAT Lending Library!


Our Lending Library is always growing so I thought it would be nice to list the current
BWAT LL carriers.

Wovens:


 Size 4 Little Frog Sunny Agat Linen/Cotton


Size 5 Little Frog Akawana 100% Cotton


Size 6 Natibaby Nepal 100% Cotton


Size 6 Oscha roses Aphrodite 50/50 Linen/Cotton


Size 6 Didymos Nino 100% Cotton


Size 7 Natibaby Lahti 100% Cotton


Ring Slings:


Natibaby Africa Morning with a pleated shoulder 70% cotton/30% linen


Girasol Antigua with a gathered shoulder


Zolo Cotton Ring Sling


Soft Structured Carriers / Full Buckles:


Boba 3G


Standard/Standard Kinderpack - Going Places


Toddler/Standard Kinderpack - Grey Vehicles


Standard Tula Groovy Guitars


BabyHawk Oh Snap!


Angelpack LX


Asian Style Carriers:

Lily & Lotus Eli Hemp Mei Tai

  Obimama SS2 Welter Weight Mei Tai

Topatop Ring Waist Mei Tai

Anna Carrie Baby Mei Tai


 Table Cloth Conversion Podaegi (Pod)

Stretchy Wraps:

XS Katan


Boba Wrap


Ashley Ritchie is a lover of all things babywearing and 
is currently working on her CBE certification through the 
Babywearing Institute. When she is not obsessing about 
babywearing she is the owner / WAHM of 
Tulsa Teethers & More LLC, 
where she makes and sells Baltic Amber,
chomp teething & babywearing necklaces, 
& wrap scrap jewelry. 

Monday, September 9, 2013

Carry of the Week (CoTW) - Front Wrap Cross Carry

I love woven wraps. Love, love, LOVE them. I love how versatile they are and how I can do a front carry, hip carry, or back carry all with my same piece of cloth. I remember the immense excitement when I ordered my first wrap and the anticipation I felt as it traveled to my home. But I also remember the overwhelming panic that overcame me when I finally received it and realized that I had to somehow use this piece of cloth to attach my infant to my body! I watched video tutorials. I scoured picture instructions. I re-watched. I read. I prepared. And then, five minutes into my first wrap job, baby red-faced screaming, me drenched in sweat, tears streaming down my face, back aching, I almost threw it in the trash. Then I thought, why was I making this so hard? I didn’t have to learn the technical term for every pass, I didn’t need to know there were roughly 1,456,098 ways to do a front carry, I didn’t need every inch of the carry to be perfect - I needed to relax. I was doing this to make my baby happier and my day a little easier. So I picked one carry I would master, Front Wrap Cross Carry (FWCC), and decided for the time being to only focus on that one carry. And that’s what I did.


Now, much further down the road, I am comfortable doing loads of different carries but there are so many more out there I want to try before my babywearing days are done. I had often seen “Carry of the Week” on different boards and groups but always felt too overwhelmed to add my not quite perfect picture to the group. Again, I needed to relax.
 
As motivation for myself, and a road-map for others who may feel as I did, I thought it would be a great idea to start our own Carry of the Week! Each week we will pick a different carry and include tutorials, instructions, and pictures. There may be variations. There may not be. We will try and alternate between a more beginner carry and a more advanced so there will be something for everyone! If there is a carry you love or want to learn, please feel free to write your own blog post for a Carry of the Week as well.
 
We would also love everyone to contribute a picture of themselves doing the carry of the week, along with what wrap and size they are using on the Facebook page. Add in any tips you discovered doing that carry and any snags you ran into. This is a group effort and the more participation the more fun we will all have!
And so, without further ado: Carry of the Week - Front Wrap Cross Carry!

The FWCC is a perfect beginner carry. In fact, if you started with a moby wrap on your babywearing journey you are probably already familiar with how it works!

It is a great carry for younger babies because it offers a ton of head support and is super easy to breastfeed in.  It also works with heavier babies because of the multiple passes that distributes the weight for mom or dad. A size 5, 6, or 7 wrap is needed to do a FWCC.

The basic steps of a FWCC are:
1 - A torso pass (a torso pass goes over the baby and then under both arms of the wrapper);
2 - Cross in back, going back up over your shoulders;
3 - Two cross passes (a cross pass goes over the baby diagonally), either spread out over baby or gathered and bunched;
4 - Tied in back.

http://www.youtube.com/watch?v=xRSTW8h5lcs&NR=1 (how to tie a FWCC holding your baby in your arms without a pre-tie)

Picture Tutorial:

Variations:
Nursing in the FWCC, Tied under Bum, and Semi-FWCC (can be done with size 3 and 4 wraps), Picture tutorial: http://bwiofpeoria.org/blog/tag/front-wrap-cross-carry/

Semi-FWCC (or “short”) tied under bum video tutorial if you have a size 3 or 4 wrap:
http://www.youtube.com/watch?v=j9v6tSljTt8

And here is Solomon and I in a size 6 Mulu:
 
And here Sol passed out about 3 minutes after wrapping:
 
I hope you guys have fun with our carry this week. Please let us know how it works for you and post your pictures on the FB page! I would also love to hear about any carries you would like to see in the future or other suggestions you may have. So please feel free to make suggestions or write a blog post for Carry or the Week as well!


Tiffany Johnson is a breastfeeding, baby wearing, co-sleeping, attachment parenting mama to three beautiful children. She is currently taking a leave of absence from her busy career as an estate planning attorney to focus on her home and family. In her spare time she loves crafting, reading a good book, red wine, all things geeky, and loving on her babies. 

Thursday, September 5, 2013

Middle Markers


mid·dle mark·er [mid-l mahr-ker] noun


1. something used as a mark or indication, as a bookmark, of equally distant from the extremes or outer limits; central: the middle point of a line*

As you can see the middle marker indicates the relative middle of the woven.  If measured from end to end this will be off slightly due to the tapers.  Also, it is not uncommon for the middle marker to be off by several inches/centimeters or even by several feet/decimeters.  This is especially true in a woven that has been chopped into a shorter wrap.  It's also possible for one rail to measure slightly longer than the other. 

There are many styles of middle markers, even the absence of one!  Some are tags with logos, product information, etc.  Others can be a change in weft color, weaving change, or textured/raised threads.  If shopping on the swaps you may even run across ones that have been drawn on with permanent marker. 

Even if your middle marker is not true to the middle of the woven, it is still a great indication of a starting place that is easy to locate in the middle of the night.  Below are some examples of middle markers:
 
No middle marker (not even a trace of an old one) on Didymos Moritz 
 
Single product information middle marker on Colimacon et Cie Miel et Malice Natural Low Water Immersion dyed by OffyCloth

Logo middle markers on each rail of a Little Frog Linen Agat Natur

Multiple weft color change to indicate middle in a Bristol Looms woven

Textured (Tactile) middle marker on both rails of an Uppymama
 
Blessing thread middle marker on a Farideh woven

Weave change middle marker


*References definitions through dictionary.com
C.J. North is a Babywearing Institute Scholar who is also a certified elementary teacher.  She stays home with her three kids; 6yo stepson, 2.5yo son, and 6mo daughter.  C.J. has a love/hate relationship with cloth diapers and is crunchier than she ever thought she would be.  She also manages the allergy and special needs of her family, while being overly addicted to research.
 
 
Did you miss my last post?  Check it out here: http://bit.ly/17Amzzl